• Skip to main content
  • Account
  • Announcements
  • Contact

RSVP Pro Plugin

Easy RSVP and Event Management for WordPress

  • Features
  • Documentation
  • Use Cases
  • Pricing

Cristian

October 10, 2015 By Cristian

Sub-Events

Often times an event will have multiple sub-events where the attendee list needs to be shared. A possible example could be a multi-day conference during which there will be dinners for select VIPs, a variety of talks, and events with a maximum number of attendees.  Getting the RSVP setup and collecting the pertinent details for the previous scenario is easy with the sub-events option.  In this how-to, we will go over the details on how this option works.

To create a sub-event you can either add an event or modify an existing one. The one field you must set is the parent event. The parent event will be the main source of the attendee list.

setting_parent_event

In the above picture we have an event called “Test Sub Event” and we have set the parent to be “Test Event.” Once this change has been made you might notice that there are fewer settings for the sub-event. The reason for this is because not all settings are pertinent to sub-events.  For example, it wouldn’t make sense to have open registration on a sub-event when the parent event has a set list of attendees.  You can, however, make custom questions for each sub-event you create.

However, one setting that is available for parent events and sub-events is the ability to specify a restricted guest list. On the general tab of the settings you will see a new drop down called “Attendee access to event.”

attendee_access_dropdown

This drop down has two values:

  • Open – All attendees on the attendee list will have access to the sub-event.  Or, if it is an open RSVP setup, anyone can RSVP for this event.
  • Select – Specify a certain subset of people who can RSVP to the event. When these select people are RSVP’ing, they will see these additional events on their form. People who were not selected for the sub-event will not see this event as an option. If a person is invited to a “Select” event and add an attendee they will also be allowed to go to the event.

If you chose “Select” access, an additional field will be displayed that will allow you to choose who will have access to the event. It is the same control you see when creating private custom questions.

attendee_access_select

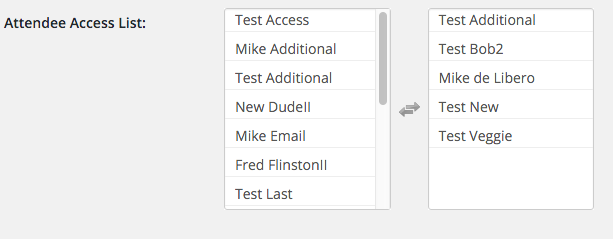
If you click on a sub-event’s attendee list and try to modify an attendee you will notice not all fields are editable. The reason for this is the main event’s attendee list is expected to be where you do your primary editing (email address, etc). You can edit the custom questions for the attendee and their RSVP status in a sub-event.


September 30, 2015 By Cristian

Setting Up an Event

There are many different options and configurations you can do with the Pro version of the plugin. We tried to make the plugin as flexible as possible as we know that all events are unique. This how-to will discuss some of the options and customizations you can set for an event.

Adding an Event

The first step to creating an event is by clicking “Add Event” in the admin menu:

add_event

Once you click “Add Event,” you will be presented with the general settings screen. This is where you can specify settings that will impact how the event works.

We will start with the required settings.

Event Name: This setting is the name of the event, it will be displayed on the front-end, in the admin area, and in the email notifications.

RSVP Open Date: This setting specifies when attendees can start to RSVP for an event.

RSVP Close Date: This setting specifies when attendees will no longer be able to RSVP for an event.

Those are all of the required settings for an event. With this information, you will get a simple event for which people can RSVP.

Some other settings on the general tab are described below.

Parent Event: Selecting a different event as a parent will make the current event a sub-event, and the attendee list will be shared from the parent to the child event(s). This is often used if you want to share attendee lists and you want all of the events to be RSVP’d to on a single form.

Specify roles that can access configuration functionality: This setting limits the WordPress roles that can access any of the settings or configuration functionality on the admin side. This was initially created when you have users who should be able to manage attendees but nothing else about an event.

Attendee Access to Event: This setting specifies if anyone on the attendee list can RSVP or if only specific people on the attendee list can RSVP. This can be useful when you have sub-events or a global attendee list to narrow down the allowed people to RSVP.

Attendee Access List: This is used when the attendee access is set to “Select.” Only the attendees in the “attendees who have access” area will be able to RSVP.

Surfacing the Event to Attendees

Now that we have an event, we need to add it somewhere so people can RSVP. Navigate to a page or post and search for “rsvp” in the Gutenberg blocks and select “RSVP Pro Event Form” like below:

Once the block is added there will be block settings on the sidebar allowing you to select the event.

Once an event is selected hit update and the form will now be part of the page or post you added it to.  You can have any content (text, images, etc..) surrounding the RSVP block.

If you ever have any questions feel free to contact us, we are here to help!

September 19, 2015 By Cristian

Multi-site license vs. Single license

One fairly common use case for the RSVP Pro plugin is for event management and wedding companies to offer the plugin in a white label fashion. An easy way to do this is by enabling a WordPress Network (aka a multi-site instance), however, until recently the user experience was not the best in this case. Depending on how you wanted to look at it you were installing it on a single instance, however, you would get an error that the license was invalid. The multi-site license is a way to fix this so the error goes away and it continues to work better in a network.

Now when you install the pro version of the plugin and network activate it you can specify the license in the network admin section. As long as you have a multi-site license everything will validate correctly and no more invalid license messages will appear.

What happens if you install the pro plugin on just one blog in a network with a single-site license? It will operate just like you would have if you had installed it on a standalone WordPress instance as it should.

The other use case for a multi-site license is if you are a consulting shop that is going to end up using it on more than nine sites and so instead of doing multiple purchases you can just purchase it once and use the same license key for all of the sites.

Filed Under: RSVP Pro Plugin, Uncategorized

September 1, 2015 By Cristian

Using Custom Questions

Custom questions are one of the great ways to customize any of the RSVP forms to your specific event needs. This article will talk about how you can use them in your events.

Disclaimer: This article will discuss custom questions while using the Pro version of the plugin. You can use this as a guide for the free version of the plugin but certain functionality will be missing.

How to Access Custom Questions

To access the custom questions hover over the event name and you will see a set of links below it. On the second row will be a link for custom questions, click it.

custom_questions_link

Custom Question Sort Order

Once you have a few questions you might want to rearrange the way they will appear on the front-end. When questions are displayed they will be displayed in the order that is listed in the custom question screen. To change the order all you need to do is drag and drop the questions to be in a different order. Once that is done you then click the “Save Sort Order” button.

https://rsvpproplugin.com/wp-content/uploads/2015/04/drag_drop_custom_questions.mp4

Adding / Editing a Question

When you click on “Add a Custom Question” or click on an existing one to edit you will see the following form.

custom_question_form

Let’s break down what each field means.

The question grouping field has two values:

  • Question asked to everyone (the default):  each custom question will show up under each attendee to be asked and answered individually
  • Question asked once per associated attendees: each custom question will only show up once and underneath the person who is RSVPing. The answered question will have the answer stored for each associated attendee.

The question type field specifies the many different types of questions we can create, the possible values are:

  • Short Answer (the default): This question type just asks the question and gives the attendee a text input box to type in their answer.
  • Multiple Choice: This question type will allow you to add a list of possible answers (discussed more below) and will display them as a set of checkboxes for an attendee to choose from.
  • Long Answer: This question type will give an attendee a text area with multiple rows to answer a question. This is similar to the default “note” question.
  • Drop Down: This question type will allow you to add a list of possible answers (discussed more below) and will then display it in a drop down for an attendee to select only one of the options.
  • Radio: This question type will allow you to add a list of possible answers (discussed more below) and will then display it as a set of radio buttons for an attendee to select only one of the options.
  • Admin Only: This question type is only displayed in the admin area. It can be useful when you have specific notes or items you want to have in only the admin area. A good example of this might be seating information or food choices you are defining for people.
  • Read Only: This question type is mainly a way to show information to an attendee, like their table assignment or hotel room number.

The question field is where you input in the question that you want to ask the attendee.

The is required? check box specifies if the question must be answered, by default all custom questions are optional.

The only ask question to associated and new guests? check box specifies if the question should only show for associated guests or when you click “add additional guests.”

The question permission level drop down has two values:

  • Public (the default): everyone sees this question and is asked it
  • Private: only select attendees are asked this question

The only show question for RSVP status drop down is used for if you want a question to only be displayed for a given RSVP status.

There are two more optional areas that will show up on the form depending on some of the above options you choose for your custom question. The first optional area is the answers area, if you choose a question type that has a specific set of answers you will be able to add them in this section. This is what an answers area looks like after adding a few answers and editing the question again.

answers_area

Clicking on add new answer will create a new input area for you to specify additional answer options. Each answer you can specify if it is the default choice and to delete an existing answer just check the delete box and save the question.

The second option area is when you set the question permission level to private this will display two combo boxes that allow you to select which attendees can view the question.

custom_question_attendee_select

You can move an attendee from one area to the other just by click on the name.

Once you have the question all setup just make sure to hit save and you will be all set!

September 1, 2015 By Cristian

Migrating from Free to Pro

First, thank you for purchasing the Pro version of the plugin!  We think that you will like all of the extra options and flexibility that the plugin allows.

Part of that flexibility is the ease with which you can transfer your work from the free to the Pro version.

To begin with, install the pro plugin; don’t worry it can run side-by-side with the free plugin.

Next go to the Pro area/tab on your admin site and create an event.

After creating the event, hover the mouse over the event.  Additional links will now be available, one of which is, “Import from Free RSVP.”migrate_linkIf you click on this you will get an import prompt to help prevent accidentally importing the data.import_promptAfter clicking the “Import!” button, you will get confirmation when the import is complete.  You may then continue to work on your event using the Pro version.  From a functionality stand point, you do not need to delete the free plugin, it will not interfere with the Pro version.  However, there is always the chance of accidentally managing your event via the free version, even though you purchased the Pro plugin.  In order to avoid this mistake, we recommend deleting the free plugin, only AFTER verifying that all of the information migrated over to the Pro version.

  • « Go to Previous Page
  • Page 1
  • Interim pages omitted …
  • Page 5
  • Page 6
  • Page 7
  • Page 8
  • Page 9
  • Go to Next Page »
  • Account
  • Announcements
  • Contact

A MachoThemes Product