The Pro version of the RSVP plugin includes a shortcode that allows for an attendee list to be displayed in a public area of your site. This article will discuss how the attendee list works, how to set it up, and what relevant options are available.
Initial Public Attendee List Setup
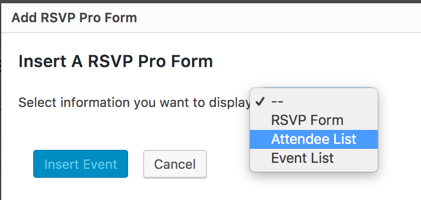
To make the attendee list public, you need to include a shortcode on a page or post that the attendee list is to be displayed. Go to the page or post you want to add the shortcode on and click the “Add RSVP Pro Form” button.

A pop-up will be displayed, use the “Select information you want to display” drop down to select “Attendee List.”
A new field will be displayed which allows us to select the event we want to use for our public attendee list. Select the event.
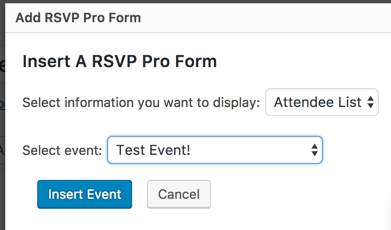
Finally click the “Insert Event” button and the shortcode will be entered into the editor screen.
While inserting in the shortcode there was an option to select different types of information to be displayed. The other options are additional features within the RSVP Pro plugin including the front-end form that invitees use to RSVP and the ability to see a list of all the events happening in the future.

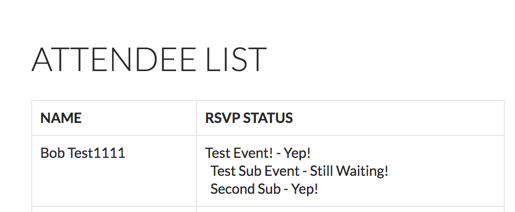
If necessary, the public attendee shortcode can be combined with other shortcodes. Once that page has been created, save the page/post. The list of attendees will now be displayed on a public-facing area of the site.
Public Attendee List Options
Now that the attendee list is setup, there are a few customizable options to review. All the options can be found on the main event settings area under the “Public Attendee List” tab:
- “Only show a specific RSVP status on public attendee list”: This option allows you to show only attendees who have selected one RSVP status. For example, maybe you want to show only the attendees that have said “Yes.”
- “Allow attendees to modify their status via the list”: This option surfaces the ability for attendees to change their RSVP status for an event from the attendee list. There is no type of protection from one attendee changing the status of another, so please understand that risk exists when enabling this functionality.
- “Show attendee search on the attendee list”: This option will surface a search form at the top of the attendee list that can be used to narrow down the list to specific attendees. It will search across the first and last name, along with any of the custom questions that are being displayed on the public attendee list.
- “Specify search text”: This allows an admin to change the text that is shown next to the search form, the default text is “Search Attendee List.”
- “Attendee list sort order”: This option allows you to specify how the public attendee list is sorted when displayed. By default, the attendee list will be sorted by first name.
- “Hide RSVP status from list”: When this option is checked, it will just show the attendee names along with any custom questions that have been selected.
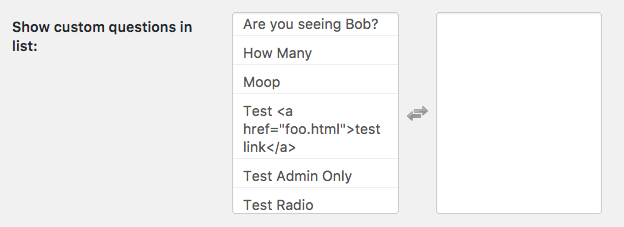
- “Show custom questions in list”: This option allows you to specify custom questions to be shown on attendee list. On the plugin and in the example below, the left side contains questions not currently being shown and the right side has questions that are currently displayed.
Additional Attributes for the Short Code
Sometimes there might be the need to display the attendee list for an event on different pages and show different data. If that is the case there are additional attributes that can be added to the shortcode to customize the output of a specific attendee list. Using the attributes will take precedence over any options specified in the settings area. The attributes are as follows:
- hide_status: possible values true, false
- show_email: possible values y, true, n, false
- show_associated: possible values y, true, n, false
- show_search: possible values y, true, n, false
- show_summary: possible values y, true, n, false
- allow_checkin: possible values y, true, n, false
- allow_change_status: possible values y, true, n, false
- rsvp_statuses: possible values yes, no, maybe, no response, waitlist
- sort_order: possible values rsvpStatus, firstName, lastName, rsvpDate, email
- custom_questions: possible values – the ID of the custom question. This attribute can show up as many times as you want in the short code.
As an example say there is a password protected page that shows all of the attendee information on the attendee list including the ability to check-in. However, later on, it is decided that there should be a public attendee list showing the person’s name, status, custom question id of 12 and nothing else. On this new page a shortcode would look like:
With these options, the public attendee list is flexible and should work for most cases. If you do run into a case where something else is needed, please contact us!