• Skip to main content
  • Account
  • Announcements
  • Contact

RSVP Pro Plugin

Easy RSVP and Event Management for WordPress

  • Features
  • Documentation
  • Use Cases
  • Pricing

Announcements

June 30, 2019 By Cristian

Managing Attendees Across Multiple Events

Recently a person asked how the RSVP Pro plugin could handle the case where you had thousands of attendees, and each attendee should only be able to RSVP for specific events. This is a complicated use case and one that I thought would be an excellent example of how flexible the RSVP Pro plugin can be.

So, how would the RSVP Pro plugin solve it? The answer is through a combination of the global attendee list, select attendees, and importing. I will break down each thing below in how you could achieve this.

First thing you will want to do is create some of the events you want people to RSVP for and make sure to turn on “select.” For a good starter check out this guide.

Once you have some of the events created, let’s turn on the global attendee list. Turning on this feature will allow us to “share” the attendee’s across the events. Even though we have enabled the global attendee list functionality, we don’t have anyone in the list so we should now import some people. If we know who should have access to the list, we can do that now via the import process.

Below is a simple example I have set up. Where we have two “select” events that we want different attendees to get access. Also, with the global attendee list, you can specify how many additional people a global attendee can invite to a specific event.  With this file setup, let’s import it now.

If you click on the “import attendees” link in the global attendees’ area.

Then we upload the file and click “next.” This next screen is where we map the different fields. The ones I want to call out that are different for global attendees are the ones below.

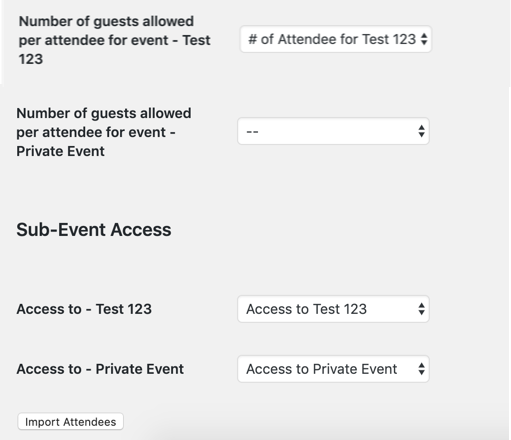
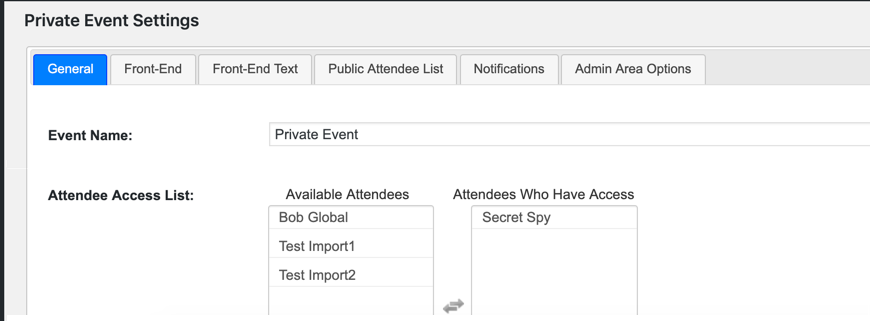
Once we have all of the fields mapped, we can import it. Then we can go to an individual event to confirm the import by looking at who has access to a specific event.

What happens if you need to reimport and revise the information? This is possible if a global attendee is found with the same first and last name AND email address it will update that record instead of adding a new person to the list.

One more thing that we can setup is a shortcode that will allow someone to enter in their email address or something similar to see all of the events they can RSVP for. This is where the attendee event list shortcode comes in to play which you can read about here.

Have any questions? Please get in contact with us; I love to hear from everyone.

Filed Under: Uncategorized

April 1, 2019 By Cristian

Custom Question File Type & RSVP Pro Frontend Management

This past month two feature releases occurred — the first for all RSVP Pro plugin customers I have released a file custom question type. Now when adding a custom question, there is a “file” question type which will allow your attendees to upload files that you might need for your event.

The second release was our first extension for the RSVP Pro plugin the RSVP Pro Frontend Management extension. This extension allows you to surface the ability for other people to manage the attendee list for a specific event. More information can is at the extensions information page.

Are there other features or extensions you want to see added to the plugin? Please let us know!

Filed Under: Uncategorized

November 22, 2018 By Cristian

New RSVP Pro Attendee Import Workflow

One of the frequent support requests I receive for the RSVP Pro plugin is questions surrounding the attendee import functionality. When the import process was created eight(!) years ago. You had to have a specific file layout in your spreadsheet, and it was rather fragile. The import process was way overdue for an overhaul.

With the release of version 3.8.7 the import process is much easier to use. Here is a video showing the new workflow when importing attendees.

With the new process as long as you have your attendee information in a CSV or Excel file, you can import it into your event. The only required field is either a first OR last name. You can read more details in the updated documentation.

I hope it improves your the workflow. If you have any feedback, please contact me. I love to hear from my users.

Filed Under: RSVP Pro Plugin

October 27, 2018 By Cristian

2018 Year-End Features

Over the past few years, I have written a lot of changes some big and some small to the free and pro version of the RSVP plugin. However, unless you comb through the changelog or if you were involved in the change yourself, it was doubtful you knew about the changes. Going forward when significant features are planned or are getting close to release I am going to start to write about them. Speaking of which…there are two significant changes that I want to write about now. I plan to have these changes released by the end of 2018.
Improvements in the Import Process
Currently, when importing attendees into an event, a person has to create a specific information layout in the Excel file. This can be time-consuming and error-prone. That will be changing soon as there will now be a two-step process where you can specify which column in the Excel file goes to which field the value should go to. The hope is to make it less time consuming and more accessible for people to use.
Front-end Attendee Management
With the business version of the plugin, you get an additional plugin that allows you to add attendees on the front-end. That is a pretty limited feature, but it is the start of something bigger. Soon there will be the ability to manage attendees via the front-end. This will make it so your clients can maintain the attendee list without having access to the admin area of their WordPress site.
Are there any other features you would like to see get added or improved in the plugins? If so let me know.

Filed Under: Uncategorized

October 18, 2018 By Cristian

Sending Inline Images via WordPress’ WP_Mail

Recently I was implementing the ability to send QR codes in the RSVP confirmation emails. While doing that I ran into a stumbling block on how to send attachments inline. Since there didn’t seem to be any good documentation on how to do this minus some StackOverflow posts, I thought I would share how I did it and the lessons I learned in regards to sending images as emails in WordPress.

The First Attempt

Initially, when implementing this feature, I tried to do a base64-encoded image inline with the email. However, that wouldn’t show up when the email was viewed in Gmail’s web interface. So, I kept that there and also attached the QR code at the bottom of the email as well. That worked but was pretty ugly as that meant every email with QR shortcodes had at least two QR codes in it. That would be pretty confusing for both attendees and people working events.

Inline Attachments to the Rescue

To fix this I went with inline attachments. The only problem with this and the reason I didn’t do it this way in the first place is that there was no good documentation on how to do this. Especially when you were sending out many different emails. Below is, in general, the solution I came up with which worked for my use-case. Hopefully, it can be useful to some other person as well.
In my case, the code, that sends the email is separated from the part of the code that prepares the email body for sending. To get around this, I used a global array in my plugin to temporarily store the images I wanted to inline attach. If there was one object that was just being passed around, I would have stored the information in there, but that is currently not the case for my code base. I secondly created a wrapper around the wp_mail function which we will use later to implement the inline attachments. Below is the starting of the wrapper:
function example_send_mail( $email, $subject, $body, $headers = '', $attachments = array() ) {
    wp_mail( $email, $subject, $body, $headers, $attachments );
}
I then went through my code and replaced all of the calls to wp_mail with this new wrapper function. One thing I made sure to do with the wrapper is to use the exact same parameter ordering and defaults as wp_mail, so it was simple to swap.
Once I had that in place, it was now time for me to get inline attachments working. This was broken up into two separate pieces of work:
  • Email body generation
  • Attaching the files to the email right before it sends

Generating Content

While generating content for the email I would check to see if an inline image was needed. If needed I would create the image and then add it to the global array with the following attributes:
  • uid: A unique identifier that is used for inline attachments this needs to be referenced to inline attach the image
  • name: The name of the attachment that the user will see
  • file: The path to the file that needs to be attached
The code looked something like.
$uid                     = uniqid();
$name                 = 'Inline Image.png';
$file_path            = generate_and_save_image();
$inline_attachments[] = array(
    'uid'  => $uid,
    'name' => $name,
    'file' => $file_path,
);
We then use the $uid variable for the inline image in the body of the email.
$body .= '<img src="cid:' . $uid . '" />'

Basically, the email clients see the “cid” and try to find an attachment with that ID and then shows it inline.

Attaching the Images to the Email

Now that the content has been generated we need to go back to the wrapper function we wrote earlier and attach the images to the email.
To do this, we will want to add an action with a function to embed the image. It looks like.
add_action( 'phpmailer_init', function( &$phpmailer ) use( $inline_attachments ) {
    $phpmailer->SMTPKeepAlive=true;
    foreach ( $inline_attachments as $a ) {
        $phpmailer->AddEmbeddedImage( $a['file'], $a['uid'], $a['name'] );
    }
});
What this function does is adds an embedded image with the attributes we specified when we were creating the email content. We want to do this before the wp_mail function is called. After the wp_mail function is called, we want to clean-up the images that we generated as well. Here is roughly what I wrote.
foreach ( $inline_attachments as $a ) {
    if ( file_exists( $a['name'] ) ) {
        unlink( $a['name'] );
    }
}
This is what the finished wrapper function looks like.
/**
 * Example wrapper for sending email. This is used to allow for
 * inline attachments, etc...
 *
 * @param string $email The email address we want to send the email to.
 * @param string $subject The subject for the email.
 * @param string $body The body of the email.
 * @param array  $headers The headers for the email.
 * @param array  $attachments The attachments for the email.
 */
function example_send_mail( $email, $subject, $body, $headers = '', $attachments = array() ) {
    global $inline_attachments;

    add_action( 'phpmailer_init', function( &$phpmailer ) use( $inline_attachments ) {
        $phpmailer->SMTPKeepAlive=true;
        foreach ( $inline_attachments as $a ) {
            $phpmailer->AddEmbeddedImage( $a['file'], $a['uid'], $a['name'] );
        }
    });
    wp_mail( $email, $subject, $body, $headers, $attachments );

    foreach ( $inline_attachments as $a ) {
        if ( file_exists( $a['name'] ) ) {
            unlink( $a['name'] );
        }
    }
    $inline_attachments = array();
}
That is it. I hope this is helpful to others and provides an example of how you can embed an inline attachment with WordPress.

Filed Under: Misc, RSVP Pro Plugin

  • Page 1
  • Page 2
  • Page 3
  • Go to Next Page »
  • Account
  • Announcements
  • Contact

A MachoThemes Product