• Skip to main content
  • Account
  • Announcements
  • Contact

RSVP Pro Plugin

Easy RSVP and Event Management for WordPress

  • Features
  • Documentation
  • Use Cases
  • Pricing

Cristian

October 23, 2018 By Cristian

Managing Attendees

One common event activity is managing attendees. Even if the event is an open event, you might have to edit or delete an attendee. This guide is going to cover many of the common scenarios that you might have to do while managing your events including:

  • Viewing attendees
  • Deleting an attendee
  • Adding/Editing an attendee
  • Exporting attendees

Viewing Attendees

When you go to the “RSVP Pro” plugin area of your WordPress admin area, you will see the event list. On the right of each event and sub-event, there is a link to “manage attendees” click this to see the list of the attendees for the event.

After clicking the attendee management area, you will see a list of attendees. There are many different features on the attendee list screen that will make it easier for you to manage your attendees.

  1. This is the total count of attendees that are in the attendee list. The number will change as you search the attendee list.
  2. This is the bulk actions area for the attendee list. Select the attendees via the checkboxes on the left and then select the action and click on “apply.” When you pull down the bulk actions menu the current options are:
    • Delete – deletes selected attendees.
    • Send Message – takes you to the “send message” feature populating the attendees’ email addresses.
    • Check-In – Checks in the selected attendees.
  3. This button exports all attendees.
  4. Is the link you will want to click to add an attendee for your event.
  5. This area is where you can search for attendees. The way the search works on the attendee list is you can select a field to search on and type in what you want to search for. Then with each subsequent search narrows down the results further and further. To go back to the full list of attendees you have to click “clear search.”
  6. The RSVP count is the number of attendees that have RSVP’d with a particular response. If enabled, the “waitlist” or “maybe” options will show up here as well.
  7. This can change the number of attendees that are displayed on each page. Page numbers and page navigation can also be found here.
  8. Each column header that has arrows by it allow you to sort the list by that column either in ascending or descending order.

Customizing Column Display

There is the ability to select which columns are displayed on each attendee list. By default, basic attendee information and all custom questions are displayed. Depending on the number of custom questions this can lead to a hard to read display. To customize the columns that are displayed go to your event settings and click on the “Admin Area Options” tab. From there you will see a list of available columns and select the columns you want to be displayed.

Once the columns are selected click “Update Event” and then go back to your attendee list and only the columns that you chose will be displayed.

Adding / Editing an Attendee

There are multiple ways to add an attendee. You can either click on the “add attendee” link on the attendee list page, import a group of attendees or there is also an “add attendee” link on the event listing page under each top-level event. To edit an attendee, go to the “manage attendee” screen, find the attendee you want to edit, and click their name.

The same form will be displayed for adding or editing an attendee. This form will have all of the fields available including all custom questions. Besides all of the information which you can edit there are also two other features which can be useful on this page. At the bottom, there is a button to “Email Attendee” if you click this it will take you directly to the “Send Message” screen with the attendee’s email address populated. The other feature is the link to “Reset Attendee Information” this will reset the attendee, so it will be like they never RSVP’d this can be useful for testing or if someone accidentally RSVP’d for someone else.

If you have questions about this feature or have suggestions on how to improve it, please get in contact with us. We love to hear from you.
October 18, 2018 By Cristian

Sending Inline Images via WordPress’ WP_Mail

Recently I was implementing the ability to send QR codes in the RSVP confirmation emails. While doing that I ran into a stumbling block on how to send attachments inline. Since there didn’t seem to be any good documentation on how to do this minus some StackOverflow posts, I thought I would share how I did it and the lessons I learned in regards to sending images as emails in WordPress.

The First Attempt

Initially, when implementing this feature, I tried to do a base64-encoded image inline with the email. However, that wouldn’t show up when the email was viewed in Gmail’s web interface. So, I kept that there and also attached the QR code at the bottom of the email as well. That worked but was pretty ugly as that meant every email with QR shortcodes had at least two QR codes in it. That would be pretty confusing for both attendees and people working events.

Inline Attachments to the Rescue

To fix this I went with inline attachments. The only problem with this and the reason I didn’t do it this way in the first place is that there was no good documentation on how to do this. Especially when you were sending out many different emails. Below is, in general, the solution I came up with which worked for my use-case. Hopefully, it can be useful to some other person as well.
In my case, the code, that sends the email is separated from the part of the code that prepares the email body for sending. To get around this, I used a global array in my plugin to temporarily store the images I wanted to inline attach. If there was one object that was just being passed around, I would have stored the information in there, but that is currently not the case for my code base. I secondly created a wrapper around the wp_mail function which we will use later to implement the inline attachments. Below is the starting of the wrapper:
function example_send_mail( $email, $subject, $body, $headers = '', $attachments = array() ) {
    wp_mail( $email, $subject, $body, $headers, $attachments );
}
I then went through my code and replaced all of the calls to wp_mail with this new wrapper function. One thing I made sure to do with the wrapper is to use the exact same parameter ordering and defaults as wp_mail, so it was simple to swap.
Once I had that in place, it was now time for me to get inline attachments working. This was broken up into two separate pieces of work:
  • Email body generation
  • Attaching the files to the email right before it sends

Generating Content

While generating content for the email I would check to see if an inline image was needed. If needed I would create the image and then add it to the global array with the following attributes:
  • uid: A unique identifier that is used for inline attachments this needs to be referenced to inline attach the image
  • name: The name of the attachment that the user will see
  • file: The path to the file that needs to be attached
The code looked something like.
$uid                     = uniqid();
$name                 = 'Inline Image.png';
$file_path            = generate_and_save_image();
$inline_attachments[] = array(
    'uid'  => $uid,
    'name' => $name,
    'file' => $file_path,
);
We then use the $uid variable for the inline image in the body of the email.
$body .= '<img src="cid:' . $uid . '" />'

Basically, the email clients see the “cid” and try to find an attachment with that ID and then shows it inline.

Attaching the Images to the Email

Now that the content has been generated we need to go back to the wrapper function we wrote earlier and attach the images to the email.
To do this, we will want to add an action with a function to embed the image. It looks like.
add_action( 'phpmailer_init', function( &$phpmailer ) use( $inline_attachments ) {
    $phpmailer->SMTPKeepAlive=true;
    foreach ( $inline_attachments as $a ) {
        $phpmailer->AddEmbeddedImage( $a['file'], $a['uid'], $a['name'] );
    }
});
What this function does is adds an embedded image with the attributes we specified when we were creating the email content. We want to do this before the wp_mail function is called. After the wp_mail function is called, we want to clean-up the images that we generated as well. Here is roughly what I wrote.
foreach ( $inline_attachments as $a ) {
    if ( file_exists( $a['name'] ) ) {
        unlink( $a['name'] );
    }
}
This is what the finished wrapper function looks like.
/**
 * Example wrapper for sending email. This is used to allow for
 * inline attachments, etc...
 *
 * @param string $email The email address we want to send the email to.
 * @param string $subject The subject for the email.
 * @param string $body The body of the email.
 * @param array  $headers The headers for the email.
 * @param array  $attachments The attachments for the email.
 */
function example_send_mail( $email, $subject, $body, $headers = '', $attachments = array() ) {
    global $inline_attachments;

    add_action( 'phpmailer_init', function( &$phpmailer ) use( $inline_attachments ) {
        $phpmailer->SMTPKeepAlive=true;
        foreach ( $inline_attachments as $a ) {
            $phpmailer->AddEmbeddedImage( $a['file'], $a['uid'], $a['name'] );
        }
    });
    wp_mail( $email, $subject, $body, $headers, $attachments );

    foreach ( $inline_attachments as $a ) {
        if ( file_exists( $a['name'] ) ) {
            unlink( $a['name'] );
        }
    }
    $inline_attachments = array();
}
That is it. I hope this is helpful to others and provides an example of how you can embed an inline attachment with WordPress.

Filed Under: Misc, RSVP Pro Plugin

October 17, 2018 By Cristian

QR Code “Tickets”

With events where it is important to know how many people actually attended the RSVP Pro plugin offers the ability to check-in attendees. Checking-in can be even easier by including a QR code in the email that attendees receive when they RSVP. The QR code can be used as their ticket to check-in an attendee.

The first thing we have to do is enable the check-in functionality for the RSVP Pro plugin. Refer to the “Check-In Documentation Page” for detailed instructions. The summary though is to go to your main event’s “General” settings tab and check the setting “Allow Attendee Check-ins.”

Including the QR Code in Attendee Emails

Once the check-in functionality is enabled, we need to add a QR code tag to emails. The two main ways to send a QR code would be via the send message functionality or in the email that gets sent to an attendee when they RSVP. In this guide, I will walkthrough adding the QR code to the email the attendee receives when they RSVP. However, the steps are similar for both cases.

The following steps are:

  • Go to your event’s settings area.
  • Click the “Notifications” tab.
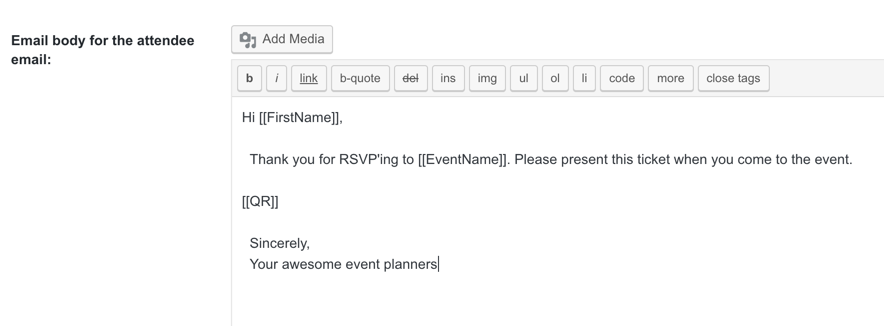
  • Find the setting “Email body for the attendee email.”
  • Add “[[QR]]” to the email body.
  • Click “Update Event.”

Below is an example email body

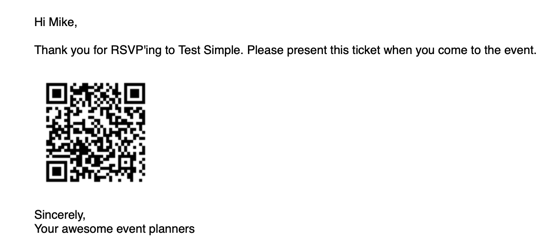
When an attendee RSVPs they will receive an email which includes the QR code.

With this, an attendee can bring it to your event to be scanned and checked-in.

Scanning the QR Codes

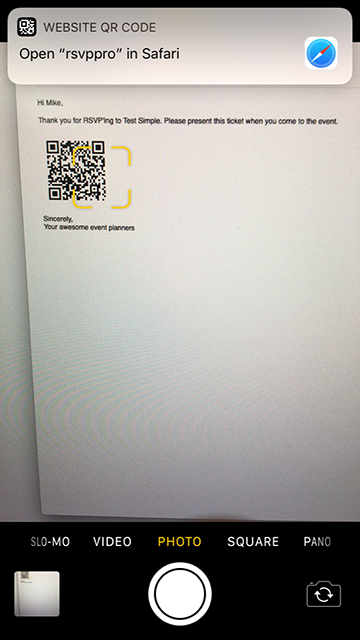
The easiest way to scan the QR code is with an internet-connected Android or an iOS device. For an iOS device you can use the camera application and when you go to scan the QR code, it will prompt you to open the link in Safari.

For Android, a third-party application from the AppStore must be used

Upon successful check-in, the message “Attendee checked in” will be displayed in your browser.

If you have questions about this feature or have suggestions on how to improve it, please get in contact with us. We love to hear from you.
July 16, 2018 By Cristian

GDPR Compliance Options for RSVP Pro

This article talks about options that the RSVP Pro plugin has that can help make the RSVP Forms compliant with the European Union’s General Data Protection Regulation (GDPR). The best way to fully ensure your site is GDPR compliant is to consult with legal counsel. This guide will only focus on the controls the RSVP form has in place that can be of help.

Disclaimer: This article contains general information; however, we strongly recommend consulting with a legal counsel that is familiar with GDPR and your business.

RSVP Form Best Practices for GDPR

The RSVP Form plugin does not collect additional information or meta-information about people who RSVP for an event. As an example, the plugin does NOT collect information like IP addresses or browser meta-data.

Each event has email, first and last name fields and the ability to specify as many custom questions. The RSVP Pro plugin does integrate with WordPress’ personal data exporter and personal data eraser.

GDPR RSVP Event Options

There are two options that exist that were created specifically for GDPR. The first one is on the “Front-End” tab for each main event.

The “Show GDPR Agreement Question” will display a question at the bottom of the event form that requires the person RSVP’ing to agree to submit the form. Below is an example of what it will look like when someone RSVPs and the feature is enabled.

The other option is on the “Front-End Text” tab and this option allows you to change the GDPR agreement question. The option is called “Custom GDPR Question.”

This option is available in case the default text does not meet the requirements of your site. Just change the question to whatever you need and the GDPR agreement at the end of RSVP form will display the new question.

If you feel that the RSVP Pro plugin is missing something or there is a feature that would make it easier to be in GDPR compliance, please get in contact with us.

April 4, 2018 By Cristian

WPML Integration

RSVP Pro works with WPML in order to provide a multi-language experience for your events. This allows you to have the same RSVP form in multiple different languages.

To use this functionality, you have to install the following WPML plugins:

  • WPML Multilingual CMS – the core feature-set of WPML
  • WPML String Translation – allows for translating static strings
  • WPML Translation Management – allows for translating dynamic content like custom questions

If you don’t have these plugins installed a good guide to start with is at https://wpml.org/faq/install-wpml/.

Once the plugins are installed and activated we can finally start to translate the strings. There are two areas where string translation has to be done.

Static String Translation

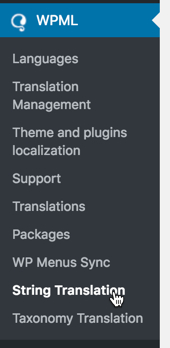
To translate strings that are static and not custom to a specific event we need to go to the “String Translation” menu item. A string will become specific to the event when you go to the event settings tab and add in text under the “Front-End Text” tab. This was done to minimize the options that need to be translated via the dynamic string translation talked about below, if there is a need that multiple languages need to be supported for items in the “Front-End Text” tab please contact us and we will make the change to support your needs.

Once you are in the “String Translation” area there will be a drop to “Select strings within domain” you will want to select “rsvp-pro-plugin.”

Once that is selected you will be able to see the static strings that can be translated for the plugin. Just click the “translations” link and enter in the translation you want for the languages you have installed.

Dynamic String Translation

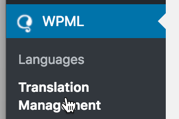
For content that is specific to an event like custom questions and email templates sent to attendees when they RSVP we have to translate the information slightly differently. To do this we need to go to “Translation Management”

Once you are there you should see each event listed. You can then select one or more events and follow the normal Translation Management flow that is outlined by WPML.

Once everything is translated all you need to do is create the different language pages!

Have questions? Contact us!

  • « Go to Previous Page
  • Go to page 1
  • Go to page 2
  • Go to page 3
  • Go to page 4
  • Go to page 5
  • Interim pages omitted …
  • Go to page 9
  • Go to Next Page »
  • Account
  • Announcements
  • Contact

A MachoThemes Product