• Skip to main content
  • Account
  • Announcements
  • Contact

RSVP Pro Plugin

Easy RSVP and Event Management for WordPress

  • Features
  • Documentation
  • Use Cases
  • Pricing

Cristian

March 6, 2018 By Cristian

Global Attendee List

The RSVP Pro plugin has the ability to have a global attendee list. This can be useful when you have many events that are not related but the attendee list is the same. It can also be useful if there are a few attendees that should be able to RSVP for all events.

How to Enable the Global Attendee List

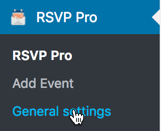
By default, the global attendee list is not enabled. To enable the global attendee list, you will need to go to the RSVP Pro general settings.

Then you will want to make sure the option “Enable Global Attendee List” is checked

Then hit save. Once you have done that go back to the event listing area there should now be a global attendee list. This listing will be displayed separately from all of the other events.

How to Add Attendees to the Global Attendee List

Once the attendee list is enabled. It is possible to import or add attendees just like you normally would for any other event. The only difference is that these attendees will show up on all of the events that get created.

How the Global Attendee List Interacts with Other Events

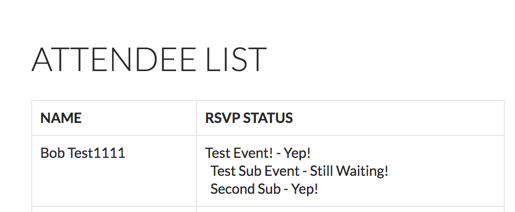
Global attendees will show up in all of the events attendee lists. They will also be included in the RSVP counts and when you export a specific event’s attendee list. When you try to RSVP from the front-end you can use a shared or event-specific attendee’s name, email address or passcode to RSVP for that event.

If a global attendee adds an additional attendee for a specific event the new attendee will only be associated with that event and not become a global attendee. When figuring out how many people a global attendee can add it will take into account global and event-specific associated attendees.

Have other questions about the global attendee list? Contact us!


January 31, 2018 By Cristian

PolyLang Integration

With RSVP Pro, we have integrated with PolyLang to make it easier to create specific translations for your install. Using PolyLang allows you to have the same RSVP form in multiple different languages.

To use this functionality, you first have to install the PolyLang plugin once installed if you go to the “Strings Translation” under the “Languages” admin area

you will see entries with a group name of “RSVP Pro” or “RSVP Pro Admin.” We created two groups to help with filtering and selecting which strings to work on when translating. For example, if you just want to translate front-end strings you would select “RSVP Pro.” To translate via PolyLang, all you need to do is change the string to the text you want and then click “Save Changes” inside of PolyLang. An example is below.

Translation Files and Polylang

The plugin has translation files in the start .po and .mo format. These are used by default for a language if a translation exists. If not then English will be the default. However, if you use PolyLang for a language that has a translation file for it the PolyLang string will be used instead.

Have questions? Feel free to contact us!


January 31, 2018 By Cristian

Waitlist

The RSVP Pro plugin has the ability to set an event capacity and a waitlist. The two main options can be found under each event’s “Front-End” settings tab.

“Event guest capacity” is used to specify a guest limit, but if left blank will allow any number of guests to RSVP. Any positive number can be used for the guest limit. If the event reaches capacity during an RSVP, a message will appear prior to finishing the RSVP process (as seen below).

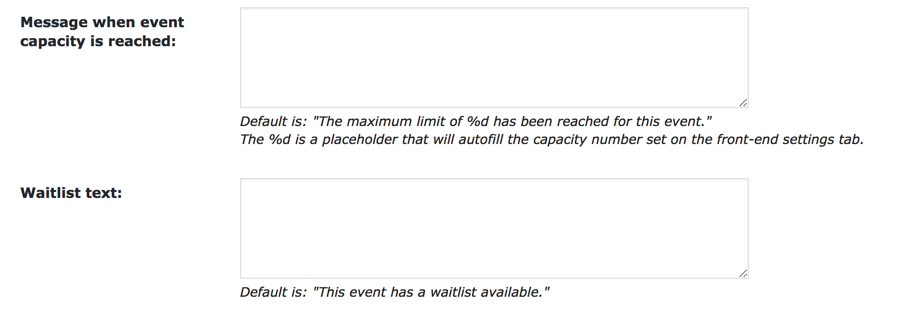
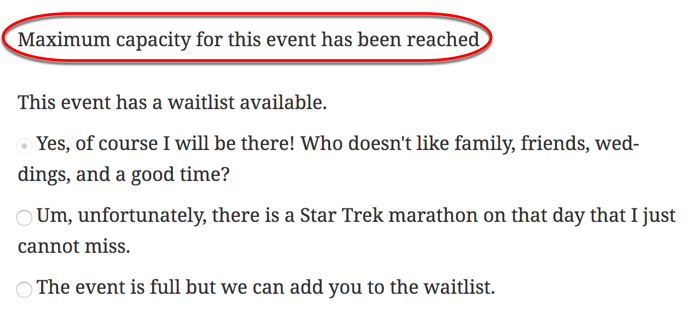
When a guest tries to be added and the event is at capacity a message will appear and if they finish the RSVP process they will be RSVP’d as “No” or “Waitlist” (if the waitlist option is enabled).

“Enable wait list” – is used to enable a waitlist. If a user tries to RSVP and the event is already at maximum capacity, they can choose to say “No” or “Waitlist.”

There are also related text formatting options under the “Front-End Text” tab.

Besides the text changes above, there are a few additional functionality options you can enable related to how the wait list works.  These are found under the “Front-End” settings tab.

“Automatically change ‘waitlist’ status to ‘yes’ when a spot opens up” – makes it so if a person changes their RSVP status to “No” or the host adds more spots to the event the person or people who have been on the wait list the longest will be changed to an RSVP status of “Yes.” An email will be sent to the attendee when their status changes from “Waitlist” to “yes.” It is possible to change the text of this email in the “Notifications” tab.

“Once ‘waitlist’ is triggered, ‘yes’ will no longer be available” – Once the event reaches maximum capacity, the event will go into a waitlist mode and will no longer provide, “Yes” as an RSVP option.  The only remaining options that invitees would be able to select are, “No,” or, “Waitlist.”  In the case that people change their RSVP from yes to no, the “Yes” option will be unavailable on the frontend.

“Is the ‘yes’ option unavailable to be selected?” – The main use of this option is actually as an indicator for the admins.  In the case where an event with an open RSVP has a full waitlist AND the option to remove “yes” as an RSVP choice has been enabled, this option will then be checked.  It is checked to show the admin that the event has now reached capacity.  A secondary use of this option is to re-allow the “yes” choice on the RSVP form.  For example, if your open registration even reaches the maximum capacity and you have removed the “yes” choice, but then later decide to add more space to your event, you would need to come back and uncheck this option.  Unchecking it will again allow “yes” as an RSVP choice, but only if you have increased the capacity.

Did this article not answer all of your questions? Feel free to get in contact with us!


November 5, 2017 By Cristian

Using Open Registrations

Introduction

The RSVP plugin has the flexibility to allow for open registrations on an event.  An open registration means that anyone can sign up and say that they will attend the event – there is no specified invitee list.  Until you setup the open registration option, the plugin will default to a set registration/invitee list. Two good examples for an open registration are a meet-up or community party.

How to Set Up an Open Registration

After creating an event, go into the event settings and click on the “Front-End” tab. There are a few options that we can enable that allow for open registration. The most important is the option with a label of “Allow Open Registration.”  When this option is checked, anyone will be able to RSVP. By default, when an event is open a passcode is required to edit an RSVP but not to initially RSVP. This is to make harder for other people to modify another person’s registration record. When going to the front-end after enabling this feature a person will be presented with a form that looks like:

The top button is for a new attendee and the bottom is for returning and/or attendees that have been added to the invitee list already.

There are a few additional Pro only options that can modify the open RSVP experience they are listed below:

  • “Attendees can’t edit their RSVPs”: selecting this option removes the lower form. It will also automatically take the person RSVP’ing to the RSVP form so they don’t have to click an extra button.
  • “For open registrations prompt to add a user if not found in user search”: selecting this option hides the “new user button” until after someone tries to find themselves to edit.
  • “No passcode required on open registration”: this will turn off the passcode being required for returning users.

If you have any questions feel free to contact us!


January 2, 2017 By Cristian

Public Attendee Lists

The Pro version of the RSVP plugin includes a shortcode that allows for an attendee list to be displayed in a public area of your site. This article will discuss how the attendee list works, how to set it up, and what relevant options are available.

Initial Public Attendee List Setup

To make the attendee list public, you need to include a shortcode on a page or post that the attendee list is to be displayed. Go to the page or post you want to add the shortcode on and click the “Add RSVP Pro Form” button.

attendee_list_add_form

A pop-up will be displayed, use the “Select information you want to display” drop down to select “Attendee List.”

select_attendee_list

A new field will be displayed which allows us to select the event we want to use for our public attendee list. Select the event.

select_event_attendee_list

Finally click the “Insert Event” button and the shortcode will be entered into the editor screen.

While inserting in the shortcode there was an option to select different types of information to be displayed. The other options are additional features within the RSVP Pro plugin including the front-end form that invitees use to RSVP and the ability to see a list of all the events happening in the future.

shortcode_on_page

If necessary, the public attendee shortcode can be combined with other shortcodes.  Once that page has been created, save the page/post.  The list of attendees will now be displayed on a public-facing area of the site.

public_facing_attendee_list

Public Attendee List Options

Now that the attendee list is setup, there are a few customizable options to review. All the options can be found on the main event settings area under the “Public Attendee List” tab:

  • “Only show a specific RSVP status on public attendee list”: This option allows you to show only attendees who have selected one RSVP status. For example, maybe you want to show only the attendees that have said “Yes.”
  • “Allow attendees to modify their status via the list”: This option surfaces the ability for attendees to change their RSVP status for an event from the attendee list. There is no type of protection from one attendee changing the status of another, so please understand that risk exists when enabling this functionality.
  • “Show attendee search on the attendee list”: This option will surface a search form at the top of the attendee list that can be used to narrow down the list to specific attendees. It will search across the first and last name, along with any of the custom questions that are being displayed on the public attendee list.
  • “Specify search text”: This allows an admin to change the text that is shown next to the search form, the default text is “Search Attendee List.”
  • “Attendee list sort order”: This option allows you to specify how the public attendee list is sorted when displayed. By default, the attendee list will be sorted by first name.
  • “Hide RSVP status from list”: When this option is checked, it will just show the attendee names along with any custom questions that have been selected.
  • “Show custom questions in list”: This option allows you to specify custom questions to be shown on attendee list.  On the plugin and in the example below, the left side contains questions not currently being shown and the right side has questions that are currently displayed.attendee_list_custom_qs_select

Additional Attributes for the Short Code

Sometimes there might be the need to display the attendee list for an event on different pages and show different data. If that is the case there are additional attributes that can be added to the shortcode to customize the output of a specific attendee list. Using the attributes will take precedence over any options specified in the settings area. The attributes are as follows:

  • hide_status: possible values true, false
  • show_email: possible values y, true, n, false
  • show_associated: possible values y, true, n, false
  • show_search: possible values y, true, n, false
  • show_summary: possible values y, true, n, false
  • allow_checkin: possible values y, true, n, false
  • allow_change_status: possible values y, true, n, false
  • rsvp_statuses: possible values yes, no, maybe, no response, waitlist
  • sort_order: possible values rsvpStatus, firstName, lastName, rsvpDate, email
  • custom_questions: possible values – the ID of the custom question. This attribute can show up as many times as you want in the short code.

As an example say there is a password protected page that shows all of the attendee information on the attendee list including the ability to check-in. However, later on, it is decided that there should be a public attendee list showing the person’s name, status, custom question id of 12 and nothing else. On this new page a shortcode would look like:

[rsvppro-attendeelist id=”1″ show_email=”n” show_associated=”n” show_search=”n” show_summary=”n” allow_checkin=”false” custom_questions=”12″]

With these options, the public attendee list is flexible and should work for most cases. If you do run into a case where something else is needed, please contact us!

  • « Go to Previous Page
  • Page 1
  • Page 2
  • Page 3
  • Page 4
  • Page 5
  • Page 6
  • Interim pages omitted …
  • Page 9
  • Go to Next Page »
  • Account
  • Announcements
  • Contact

A MachoThemes Product