• Skip to main content
  • Account
  • Announcements
  • Contact

RSVP Pro Plugin

Easy RSVP and Event Management for WordPress

  • Features
  • Documentation
  • Use Cases
  • Pricing

Cristian

August 26, 2019 By Cristian

WP Html Mail Integration

The RSVP Pro plugin has many different ways for emails to be sent out. At times you might want to make the emails more consistent looking and branded for your event. To make this easier, we added integration with WP HTML Mail. This KB article shows how to enable the integration.

First things first make sure to install and activate the WP HTML Mail plugin.

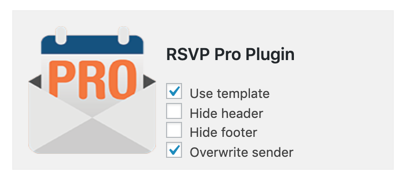
After that to enable the integration, go to “Email templates” under the settings admin menu. Click on the “Plugins” tab and make sure the RSVP Pro Plugin options are checked like below.

Finally, click “Save and Preview” and the RSVP Pro Plugin will now use the template defined in the WP HTML Mail plugin.

If you have any problems with this integration or if you have any other questions, please contact us we are here to help!

July 4, 2019 By Cristian

Attendee Event List

There are times when one person wants to see all the events they are associated with. To make this possible, there is a shortcode that will allow people to look up this information via their email address. This article discusses how to set up the shortcode and related options.

Use a page or a post to surface this functionality. Go to the editor and paste in the following shortcode “[rsvp-pro-attendee-events]” or insert the Gutenberg block.

Either way, the page or post should at the minimum look like:

Save the content, and then it is possible to view the page. Which should look something like the image below.

Then if a person’s email address is entered and they are registered for at least one event, the following page will be displayed.

There are a few changes that can be made for this functionality. To do this go to the “General settings” area under RSVP Pro in the WP admin area.

Near the bottom of the settings, there is an area with a title of “Attendee Event List Settings,” which looks like:

If you have any questions or feedback, please get in contact. We love to hear from you!

June 30, 2019 By Cristian

Managing Attendees Across Multiple Events

Recently a person asked how the RSVP Pro plugin could handle the case where you had thousands of attendees, and each attendee should only be able to RSVP for specific events. This is a complicated use case and one that I thought would be an excellent example of how flexible the RSVP Pro plugin can be.

So, how would the RSVP Pro plugin solve it? The answer is through a combination of the global attendee list, select attendees, and importing. I will break down each thing below in how you could achieve this.

First thing you will want to do is create some of the events you want people to RSVP for and make sure to turn on “select.” For a good starter check out this guide.

Once you have some of the events created, let’s turn on the global attendee list. Turning on this feature will allow us to “share” the attendee’s across the events. Even though we have enabled the global attendee list functionality, we don’t have anyone in the list so we should now import some people. If we know who should have access to the list, we can do that now via the import process.

Below is a simple example I have set up. Where we have two “select” events that we want different attendees to get access. Also, with the global attendee list, you can specify how many additional people a global attendee can invite to a specific event.  With this file setup, let’s import it now.

If you click on the “import attendees” link in the global attendees’ area.

Then we upload the file and click “next.” This next screen is where we map the different fields. The ones I want to call out that are different for global attendees are the ones below.

Once we have all of the fields mapped, we can import it. Then we can go to an individual event to confirm the import by looking at who has access to a specific event.

What happens if you need to reimport and revise the information? This is possible if a global attendee is found with the same first and last name AND email address it will update that record instead of adding a new person to the list.

One more thing that we can setup is a shortcode that will allow someone to enter in their email address or something similar to see all of the events they can RSVP for. This is where the attendee event list shortcode comes in to play which you can read about here.

Have any questions? Please get in contact with us; I love to hear from everyone.

Filed Under: Uncategorized

May 6, 2019 By Cristian

Pre-Fill URL Parameters

The free and professional versions of the RSVP plugin can pre-fill the attendee information based on values passed in via the URL. This functionality is useful when sending out emails to attendees so they can more easily RSVP for your event.

Prerequisites

It is assumed that the RSVP event has already been set up and there is a publicly accessible page that holds the RSVP event form. If that hasn’t been done, please go setup an event either using the free or professional instructions.

To use the pre-fill values, the different URL parameters will need to be added to the URL. As an example say, the page that has the RSVP form on it is rsvpproplugin.com/rsvp. The URL parameters for a first and last name might look like https://rsvpproplugin.com/rsvp?firstName=First&lastName=Last when an attendee clicks on this page the RSVP plugin will attempt to find the attendee based on the “firstName” and “lastName” parameters.

Both the free and professional versions of the RSVP plugin have the pre-fill capability. Below are the variables available for both of the plugins and the ones available only to the professional versions.

URL Parameters in Free and Professional Versions

  • firstName – For the person’s first name
  • lastName – For the person’s last name
  • passcode – If a passcode is enabled and/or required this will need to be added as well

Additional URL Parameters available in the Professional Version

  • email – If email lookup is enabled this can be used to find an attendee
  • rsvpStatus – Auto-fills the RSVP answer for the primary attendee allowed values Yes, No, Maybe, Waitlist
  • autoRsvp – Automatically RSVPs, the person for the status in the rsvpStatus parameter or the default for the event. Allowed value Y

If there are any additional questions and concerns, please contact us.

April 25, 2019 By Cristian

Translating the RSVP Plugin

Below are the details on how people can translate without modifying the HTML or the files in the actual RSVP plugin.

Step 1 – Get a translation editor like Poedit. What this does is it allows you to quickly create a translation file based off of a POT file that is contained in the RSVP plugin.

Step 2 – Download the latest version of the RSVP plugin and unzip the file. Under the languages folder you should see a file called “rsvp-plugin.pot”. Like in the below screen shot.

folder_unzip

Step 3 – Now that you know where that file is, go to Poedit and create a new translation and open the file rsvp-plugin.pot.

create_translation

Step 4 – Once it is opened it will ask you to specify the language you can use the language code or name.

enter_language_code

Step 5 – Now that the file has been created we should save it. Go to file -> save and then save it in the format of “rsvp-plugin-xx_YY.po” Where xx is the lower case version of your language code and YY is the upper case. For a list of language codes a good resource can be found at http://www.loc.gov/standards/iso639-2/php/code_list.php, you will want to use the ISO 639-1 Code.

Step 6 – Once that is saved the hard part starts, translating. Click on each row and enter in your translation text, like so:

translating

Step 7 – Once you have entered in all of the text you can now include your two files one should end in .po and one should end in .mo. Into the languages folder of the rsvp-plugin install on your WordPress instance.

Happy translating!

  • Page 1
  • Page 2
  • Page 3
  • Interim pages omitted …
  • Page 9
  • Go to Next Page »
  • Account
  • Announcements
  • Contact

A MachoThemes Product